The advanced animation skills workshop was very challenging for me. I really
struggled to animate a convincing walk cycle and it took me the entire length
of the workshop to create a cycle I'm relatively happy with. With every cycle
(walk and run), I got a click but by re-ordering the drawings I managed to
smooth that out.
The weight exercises felt easy after the walk cycles although they too were
a challenge. Trying to create the illusion of weight and get a good sense of
pace to enhance the struggle was tough. By holding certain images within the
animation and changing the length of time the others stayed on the screen, I
was able to create a sense of struggle although I feel that with more time
theses could be vastly improved. I know that my animation timing is an issues
but if I continue doing exercises like this then maybe I can stop relying so
much on my editing software to smooth out the pace and instead be able to just shoot
my animation outright without the need for post-production.
The obstacle course also shows my lack of timing. Some elements work better
than others - the monkey bars work well whereas the rope crawl has a lack of
anticipation as he slides down the pole without caution; he is crawling above
spikes and so the lack of caution detracts from the danger. It also seems like the
course is 3 separate obstacles rather than 1 fluid obstacle. If I had drawn all
the backgrounds on one sheet of paper I could have tracked my character and by
drawing my character running from course to course, I could have made it look
like a more polished and complete course.
The push and pulls are my favourite outcomes from this workshop and are the
things I am most proud of. I am also very proud at myself for being able to
overcome the issues I faced with my walk cycle. Going through my various
attempts you can see how I was able to overcomes the problems I had. I never
thought I would be able to create a functional cycle and now that I have I feel
like I've overcome my biggest challenge in the course so far. I would love to
be able to do more exercises like this so that I can iron out the obvious
flaws. Only by practicing will I be able to improve my animation skills.
Saturday, 24 November 2012
Obstacle Course Animation
I have decided that my obstacle course will consist of 3 separate obstacles:
a rope crawl, a jump and a cross on the monkey
bars. Below are the videos of the initial animation.
When the man lifts his legs to the bar at the start it is a bit slow and then as he crawls across the bar he moves far too quickly. I have to sort out these issues before hand-in. I like the element of the spikes. It adds a real sense of danger. I think I'd like to do something similar with the other obstacles so that they too have that element of danger.
I think the jump works pretty well. There is good squash and stretch and he makes great height. I'd like to add in an object for him to jump over though otherwise the action seems a bit pointless.
The monkey bar obstacle works well. As he crosses the bars he has a good pace. There is a sense of secondary animation within the obstacle as the legs move separate from the rest of the body - this gives the impression of momentum, propelling the man forward across the obstacle. I'd also want to add in another element to this obstacle. Maybe something below the bars to keep him from wanting to fall - water maybe...
Friday, 23 November 2012
Animated Obstacle Course Plan
Putting everything together about what I have leaned about movement and weight, as well as the 12 principles of animation, I now have to create an animated obstacle course. Using running, jumping, climbing &c I will create a piece of animation about a character negotiating a series of physical obstacles. Before I jump into the animation progress, I first need to plan out my obstacle course; what sort of course will I have? What will the various activities be? Once I've created my course, I can then decide how my character overcome the obstacles put before him and how easily (or not so easily) the he will navigate around the course. To create my course I will look at existing obstacle courses and then use elements of that in my own. I want to make my obstacles course look exciting and not just like the usually genetic courses. I have used references of army traing obstacle course as well as the TV show Gladiators to help me get a sense of what an obsticle course is.
The point of this exercise to to show off what I have learnt about the world of animation thus far. To do this I want to include as many of the 12 animation principles as possible. I will add in a sense of anticipation when my character is faces with a difficult task. I could add exaggeration when my character faces difficulty to add a sense humour or maybe a secondary character who completes the course with ease to show a comparison between the strong and weak. This would also add sympathy for the character giving him more appeal.I also want to attempt secondary action to add a better sense of realism to the piece. I could do this by giving my character hair.
The point of this exercise to to show off what I have learnt about the world of animation thus far. To do this I want to include as many of the 12 animation principles as possible. I will add in a sense of anticipation when my character is faces with a difficult task. I could add exaggeration when my character faces difficulty to add a sense humour or maybe a secondary character who completes the course with ease to show a comparison between the strong and weak. This would also add sympathy for the character giving him more appeal.I also want to attempt secondary action to add a better sense of realism to the piece. I could do this by giving my character hair.
Weight
After looking at pushes and pulls, I have begun looking at another aspect of
weight - the lift. Looking at reference videos of lifting and acting out a
heavy lift myself, I been able to create quick sequence sketches on the key
movements in a lift.
This animation is very rough and the struggle of the weight isn't really
there. Because of this, I have gone on to draw another weight - this time using
a weightlifter. I have watched reference videos of a weightlifter and then
drawn quick sketches.

Once animated I can see that it works a lot better but there still isn't much anticipation going on within the action. He seems to pick up the weight with ease and the timing of the animation stay consistent throughout. To help improve it I would make the weightlifter hold the weight for a while at the beginning and then try and vary the speed at certain points (making the action faster as he moves the weight to his chest and then slower when he lifts the weight above his head) to help improve the sense of anticipation.

Once animated I can see that it works a lot better but there still isn't much anticipation going on within the action. He seems to pick up the weight with ease and the timing of the animation stay consistent throughout. To help improve it I would make the weightlifter hold the weight for a while at the beginning and then try and vary the speed at certain points (making the action faster as he moves the weight to his chest and then slower when he lifts the weight above his head) to help improve the sense of anticipation.
Tuesday, 6 November 2012
Push/Pull Revisited
I have taken my previous pull and pushes and improved them. I have added in the objects and horizon lines so that they communicate better. There is abetter sense of anticapation which makes the weight more convincing. I have also sorted out the crazy line in the pull so that the weight remains constant.
Push/Pull Animation
Using my reference videos and sketches I made, I have animated 2 versions of
a push and a pull. Let's start with the pushes. Firstly the object the stickman
is pushing is missing from both push attempts. This makes it hard to see the
effort the stickman as too but into pushing the invisible object. Also he seems
to push the objects with too much ease. He lacks anticipation which would make
the push look more like a struggle. The first animation is a bit unclear. It is
supposed to look as if he is walking up a hill. However, that is a bit
difficult to see without a horizon line. By simply adding in this line I can
make my animation a lot clearer and easier to communicate. For my second
attempt, I would say that the struggle is a lot more effective although the
object is really needed to show the full extent of the weight acting on the
stickman.
For the pull, I think that the sense of anticipation is a lot more successful. You can clearly see the struggle of the weight even though the weight isn't evident in the actually frame. The tope that the man is pulling goes a bit wild in the last few frames - making it look as if the weight has suddenly become lighter. I need to make sure that the rope line stays consistent throughout to maintain the illusion of weight.
For the pull, I think that the sense of anticipation is a lot more successful. You can clearly see the struggle of the weight even though the weight isn't evident in the actually frame. The tope that the man is pulling goes a bit wild in the last few frames - making it look as if the weight has suddenly become lighter. I need to make sure that the rope line stays consistent throughout to maintain the illusion of weight.
Pull
After looking at the push, I have now begun looking at the pull. By again
completing a simple key sketch diagram, I have found that the easiest way to
portray a convincing pull is to make my character pull a rope over his
shoulder. This shows that the object is just too heavy to pull by hand and an
aid is needed. Hopefully that will give my animation convincing strain.


Push
After looking at reference videos, I have started to have my own go at animating a push and pull - starting with the push. To get a good feel for what is involved in a push, I have began by skimming the reference videos and quickly sketching out the key frames which show the strain on the body. I have done this for both of the reference videos as I felt that the first sketch didn't really indicate a successful push. It didn't really communicate a sense of weight which after all is the point of the exercise.


The second sketch is a lot more effective push. I really shows the effort my stickman has to put into pushing the heavy object. Although he sketches are a good guide for my animation, I mustn't forget to add in a sense of anticipation to make the weight of the object the man is pushing convincing


The second sketch is a lot more effective push. I really shows the effort my stickman has to put into pushing the heavy object. Although he sketches are a good guide for my animation, I mustn't forget to add in a sense of anticipation to make the weight of the object the man is pushing convincing
Push And Pull
Moving on walk/run cycles, I have begun looking at other aspects of locmotion - this time looking at weight in animation. This week I have been working on the push and pull. Pushing and pulling are very good examples of weight and how we react when trying to move heavy objects. The body undergoes great strength when trying to push and pull something with a heavy mass. The whole body has to be used in order to successfully move a heavy weight and the strain on the body is very apparent to see by the shaking of limbs.
Before I begin animating I have again looked at reference videos to aid me. Most of the reference videos I could find were already animated so it gave me a good reference of how my finished animation should look. There were loads of videos to choose from but these videos (posted below) were the best for a clear and good looking push/pull. sequence.
Before I begin animating I have again looked at reference videos to aid me. Most of the reference videos I could find were already animated so it gave me a good reference of how my finished animation should look. There were loads of videos to choose from but these videos (posted below) were the best for a clear and good looking push/pull. sequence.
Cat Run 3
This is my third run cycle. I have made it look more like the cat from my
walk cycle so that I can seamlessly go from the walk cycle to the run cycle in
one QuickTime movie. This cycle isn't as perfected as the previous one as it
clicks again and doesn't have as much squash and stretch. However, that can be
sorted out.
Walk Cycle 6
Now that I am happy with my run cycle, I have gone back to the walk cycle. I
am determined to create a convincing walk cycle. Learning from my previous
failures, I have taken the best bits and avoided the many mistakes to finally
create a cycle where the cat actually walks. Yeah the cycle clicks when its
looped but the legs make a convincing cycle. The tail is a bit wild but I think
that gives him personality. If I can just fix that click then I would have
finally created a walk which I can be happy with.
Run Cycle #2
I've taken a break from trying to create the perfect walk cycle by going back and perfecting my run cycle. This 2nd attempt is a lot better than the first and I think that it works well enough for a convincing cat run cycle. It cycles well and is quite fluid. It has good squash and stretch but this could be further enhanced for a move convincing run. There is still a slight click but is so minor that I think I can get away with it. There are a few other things that I could do to further improve my cycle (there always is). I think it is a bit slow for run but that can be altered during editing. I would also like to make my run cycle look more like the cat from my walk cycle. This will make it a lot smoother when I make the transition from the walk to the run.
However, I am very proud with how the run turned out - especially seeing the trouble I've been having with my walk cycle
However, I am very proud with how the run turned out - especially seeing the trouble I've been having with my walk cycle
5th Walk Cycle
I'm still trying to perfect my walk cycle - without success. Below is the video of my 5th attempt and in my opinion the worst. This can barely be called a walk cycle.
The legs (both front and back) don't complete full cycles. It looks as if at one point the 2 front legs instantly switch places and so a hop occurs as in the previous cycle. The worst thing is is that the front legs are the success of this cycle; I don't even know how to describe the mechanics of the back legs. The fore-back leg starts to make a full cycle but then again it looks like a switch occurs. The back leg furthest from the camera swings back but then clicks back to the beginning without cycling and as this happens, the other back leg sort of loops but with a strange hop mid cycle. It feels as if the more I work on the walk cycle, the worse it gets.
The legs (both front and back) don't complete full cycles. It looks as if at one point the 2 front legs instantly switch places and so a hop occurs as in the previous cycle. The worst thing is is that the front legs are the success of this cycle; I don't even know how to describe the mechanics of the back legs. The fore-back leg starts to make a full cycle but then again it looks like a switch occurs. The back leg furthest from the camera swings back but then clicks back to the beginning without cycling and as this happens, the other back leg sort of loops but with a strange hop mid cycle. It feels as if the more I work on the walk cycle, the worse it gets.
Thursday, 25 October 2012
Cat Run Cycle 1st Attempt
Before I committed to animation paper, I did a quick thumbnail animation using the reference video of the slow motion cat. This animation was a lot more successful than I thought it would be as I was drawing it. The movement is clearly a run and although the body stretches a bit too much and the images again don't match up, I am happy with the finish.
After a promising start, I began another cycle on animation paper. This cycle is a lot more fluid although it is a bit too slow for a run. Again there is a jump between the first and last frames and the legs slip again. I think one of the problems is that the lines are just too far apart which makes it difficult for me to keep the feet to the lines. To help improve the fluidity of the loop, I am going to try and re-arrange the frame order by starting the sequence halfway through (e.g 8, 9, 10, 11, 12, 1, 2, 3, 4, 5, 6, 7), This should help me get a better inbetween between the first and last frame.
Cat Run Cycle
Although I haven't quite perfected the walk cycle of a cat, I do also need to animated a run cycle. Personally I think this looks a lot more simplistic to animate than a walk as the legs seem to walk more in unison with one an other. To begin with I again watched videos as reference materials for my run.
This video in particular was extremely helpful in seeing exactly how a cat runs. By watching this over and over again and trying to mimic the movement every few frames, I have created a quick test for my own run cycle
 I have also created another dot diagram indicating where the legs are during a run cycle

This video in particular was extremely helpful in seeing exactly how a cat runs. By watching this over and over again and trying to mimic the movement every few frames, I have created a quick test for my own run cycle
After looking at these reference videos, I have once again created a step by step cycle diagram. Looking at this diagram, it does appear that run is more simplistic but I won't know for sure until I begin animating.


4th Cycle
Below is my 4th attempt at a cat walk cycle and you can see a lot of improvements. There is a lot more squash and stretch in the movement that makes it feel more like a cat's walk rather than a general quadruped walk. The head also feels a lot more like part of body where in the previous one it seemed to have a life of it own. The tail also has a look more fluidity although it does grow slightly as the animation progresses.
The front legs work very well as a cycle as opposed to the back. The back legs seem to need a few inbetweens near the end of the cycle. Instead of a nice fluid movement, the back legs instead seem to just simply switch places, creating a hop. I would say there needed to be at least 2 more inbetweens to fix this problem.

The front legs work very well as a cycle as opposed to the back. The back legs seem to need a few inbetweens near the end of the cycle. Instead of a nice fluid movement, the back legs instead seem to just simply switch places, creating a hop. I would say there needed to be at least 2 more inbetweens to fix this problem.

3rd Attempt
With there still being problems with my cat walk cycle, I decided to stop thinking about my cat as an outline and instead try to imagine what is going on underneath. I thought less about details like facial features and instead focused on the muscles underneath and how the react as the cat walks.
Although this has been more successful, the are still flaws - the most obvious still problem being with the click between the first and last images in the cycle. They don't match up well enough for a smooth loop.This again is down to the footing. As the animation progresses, the cats feet still don't stay consistent. By the last frame, all feet rest upon the top line instead of being evenly spread between the top and bottom lines. This makes it difficult for a smooth transition. There is clear movement within the body although I think I need more squash and stretch in order to get a more feline attitude. I need to be aware of where my feet begin and end to make a successful walk cycle and also think 'cat' when I'm animating instead of just trying to animate a general quadruped.
Although this has been more successful, the are still flaws - the most obvious still problem being with the click between the first and last images in the cycle. They don't match up well enough for a smooth loop.This again is down to the footing. As the animation progresses, the cats feet still don't stay consistent. By the last frame, all feet rest upon the top line instead of being evenly spread between the top and bottom lines. This makes it difficult for a smooth transition. There is clear movement within the body although I think I need more squash and stretch in order to get a more feline attitude. I need to be aware of where my feet begin and end to make a successful walk cycle and also think 'cat' when I'm animating instead of just trying to animate a general quadruped.
2nd Attempt Walk
After my first attempt, I decided to make a more detailed cycle that more resembles a cat. Although it looks more like a cat, it doesn't walk more a cat. If anything the walk is worse than previous. Once again, the lags don't keep to their lines.This makes for a a bad loop and again a lack of weight.

If you play it back frame-by-frame you can see that the cat does something very strange. As you can see from the image below, the back leg does something unnatural. It lifts up too much as it cycles making it seem as if it separated from the body; almost as if the cat has broken its leg. It also looks as if the back legs are a lot smaller than those in the foreground. I've tried to show all the information in the back legs which you see in the front legs which in reality just wouldn't happen.

In order to fix these mistakes, I think I should start my cycle from scratch and instead of looking at the cat as an object, I will instead use what I learnt from drawing the skeleton and draw the muscle movements and bones of the cat. Maybe this will help give me a more fluid cycle.
1st Attempt At A Cat Walk Cycle
After watching tutorials and observing how my own cat walks, I have finally committed myself to paper and created my first feline walk cycle. To begin with I focused solely on the legs. By ignoring the entire cat and focusing purely on the leg movement, I was able to get a real feeling for how the legs move. The cycle works pretty well. The leg movement is quite fluid although there is a slight kink between the first and last frame. Watching the cycle frame-by-frame I noticed that the forelegs and the back legs don't cycle evenly. There isn't good symmetry which throws the cycle off.
After focusing just on the legs, I then went on to animate the whole cat. As my first attempt it's not bad. The basic cycle is there but it is far from perfect. The tail moves up fluidly but then seems to stay frozen in the air before quickly falling back down again. I need to think more carefully about how gravity will be acting on the cat as well as ensuring that the cat stays along its walk lines. At the moment, the legs seem to all move to the top line and this creates the illusion of a float or lack of weight. Because of this, the cycle doesn't loop perfectly and clicks.
After focusing just on the legs, I then went on to animate the whole cat. As my first attempt it's not bad. The basic cycle is there but it is far from perfect. The tail moves up fluidly but then seems to stay frozen in the air before quickly falling back down again. I need to think more carefully about how gravity will be acting on the cat as well as ensuring that the cat stays along its walk lines. At the moment, the legs seem to all move to the top line and this creates the illusion of a float or lack of weight. Because of this, the cycle doesn't loop perfectly and clicks.
Sunday, 14 October 2012
Feline Walk Cycle
I've been struggling a bit to grasp the concept of a quadruped walk so to help me feel more comfortable I've been watching a few online tutorials. One in particular has really helped open my eyes to the way a cat moves. Using a comparison to a human walk cycle and adapting it to a feline walk, i can see exactly what needs to alter in order to create the right attitude.
Another informative tutorial: http://www.youtube.com/watch?v=dYCGMdQgs-I
After looking at the reference videos, I have drawn a step by step walk cycle diagram showing what the feet are doing at each point in the cycle. This will act as a guide for me when I begin the animation process. If I stick to this diagram I should find it a lot easier to create a functionally and fluid walk cycle.

 This diagram shows the position of the feet at each stage of the cycle. The black dots indicate when the foot is in contact with the floor (if the black dot has a F it means the foot is flat on the ground) and the open dots tell us when the leg is in the air.

After looking at the reference videos, I have drawn a step by step walk cycle diagram showing what the feet are doing at each point in the cycle. This will act as a guide for me when I begin the animation process. If I stick to this diagram I should find it a lot easier to create a functionally and fluid walk cycle.


Saturday, 13 October 2012
Duped Vs. Quadruped
The diagrams below show the differences between the human bone structure and quadruped bone structures. Seeing various bone and muscle structures together in one diagram really helps show the difference in bone size and the angles in which the bone stands. The longer the leg, the less of a 'spring' the animal has; a cat will get a lot more height in a pounce than a horse will get in a jump in relation to its size.


The human bone structure and muscle is almost identical to that of a gorilla's. The only noticable difference is that a human stands erect whilst a gorilla stands huntched over. However, the basic mechanics are the same. Seeing that a gorilla's structure is a lot like a humans will make it a look easier to animate. Having already animated a human walk cycle last year, I can adapt my knowledge of what I already know to fit the movement of a creature on four legs.

This diagram will also help me adapt what I already know about a walk cycle. By showing a human's foot/hand in line with various quadruped's you can see where each point varies. Comparing a man and a cat you can see that the femur is a lot more arched up which in turn means the elbow is a lot higher. This will help me give the right personality to my quadruped ensuring that it won't only look like right, but also move realistically.

Observational Drawing Of A Skeleton
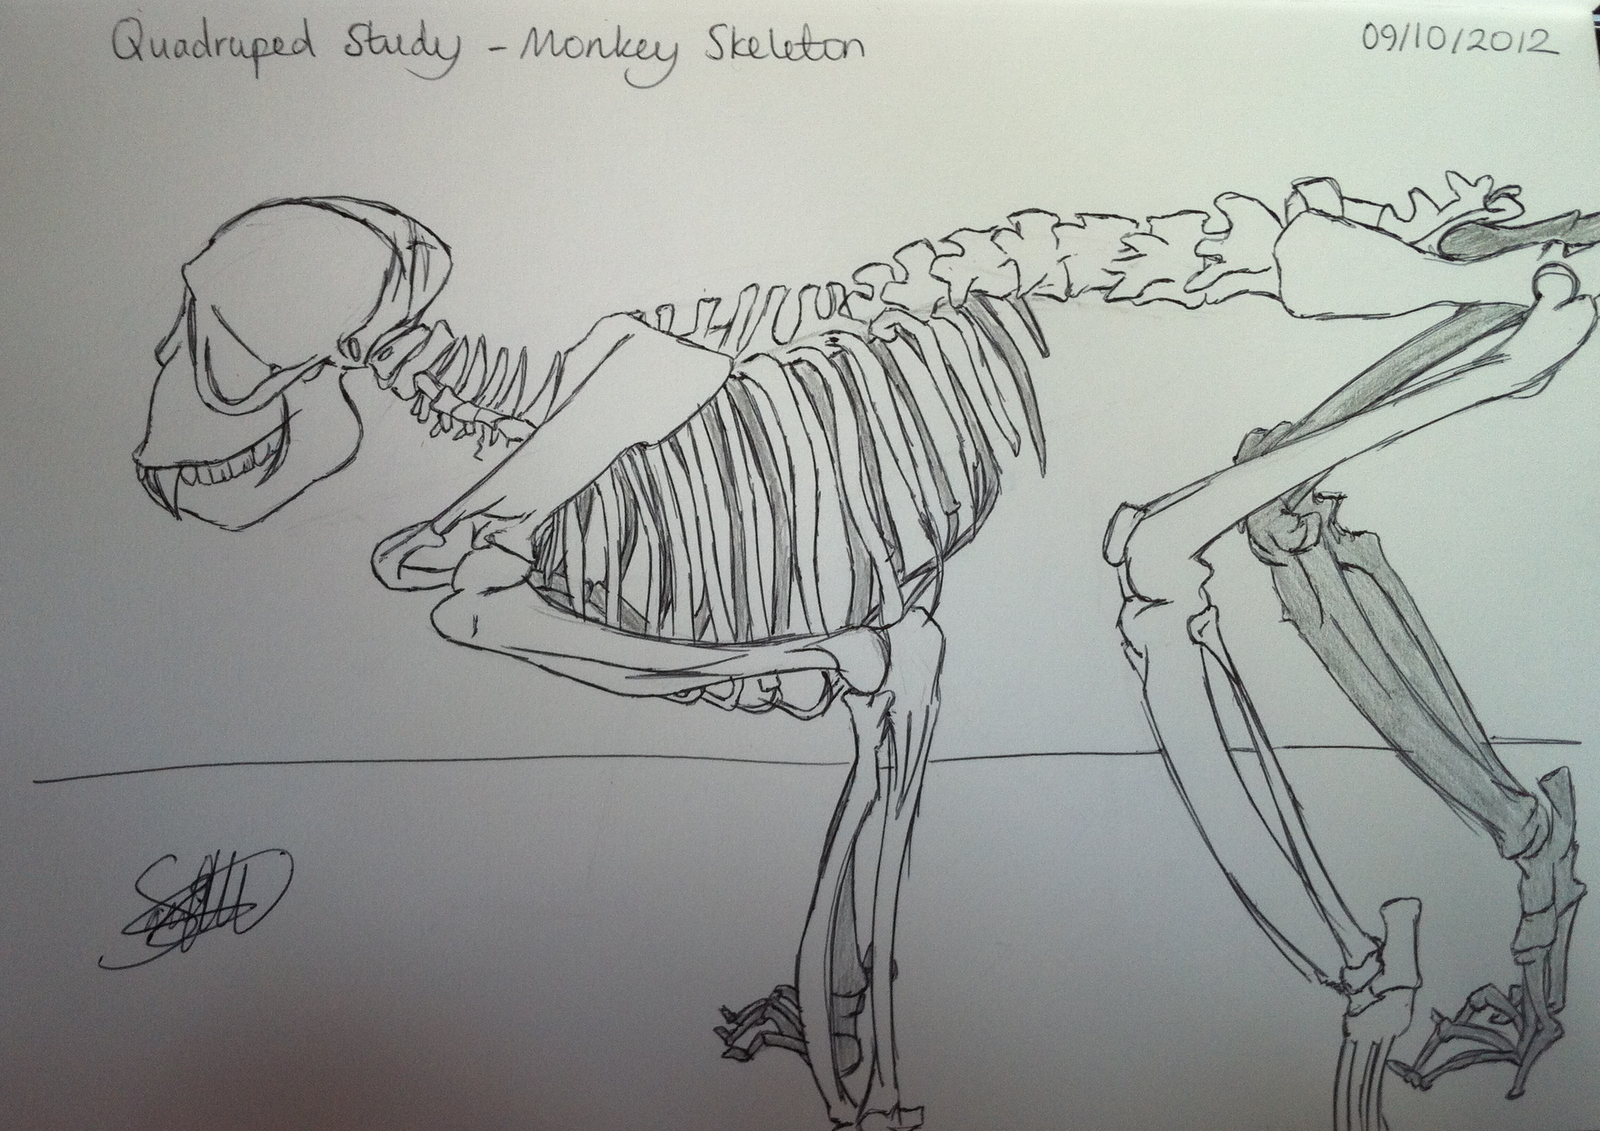
As a start to the advanced animation skills workshop we are studying quadruped locomotion. Looking closely at how four legged animals move, I should be able to pick up the rhythms of animal movement and be able to animate various gaits. To begin with, I have been looking at quadruped skeleton's. By observing the bone structure of a quadruped, I will be able to get a good sense of what is underneath the animal's and work out the mechanics of how they move. This will make it easier for me to eventually animate a walk cycle.

This observational drawing is of a monkey skeleton. I spent 45 minutes looking and mimicking what I could see in front of me. By doing this exercise, I am already a lot more informed about how a quadruped moves. Looking at the skeleton you can see that the back legs are a lot longer than the front and are therefore more bent. This extra length and bend gives momentum. All the power comes from the back legs which push the rest of the body forward. This is something that all quadrupeds share.

In the case of a monkey skeleton, you can see that the feet closely resemble that of hands. Unlike a horse or pig which have simple hooves, the monkey has various bones which allow the feet to work just like human hands. This is what gives the monkey great grip when climbing trees &C.

This observational drawing is of a monkey skeleton. I spent 45 minutes looking and mimicking what I could see in front of me. By doing this exercise, I am already a lot more informed about how a quadruped moves. Looking at the skeleton you can see that the back legs are a lot longer than the front and are therefore more bent. This extra length and bend gives momentum. All the power comes from the back legs which push the rest of the body forward. This is something that all quadrupeds share.


Subscribe to:
Comments (Atom)